I've had my Vitamix blender for a couple of years now. Of course when I first got it, we were making smoothies daily. Then I've moved away from eating too much fruit so I haven't been blending or using my Vitamix as much as I'd like. I remember sampling a tortilla soup at a Costco demonstration. It was delicious and very easy to make. At the time, I'd just figured I could google the recipe and make it at home. Of course after searching it, I couldn't find the one they'd made. Urgh! I know this dang blender can do so much more than smoothies and I really want to use it more.
So when a friend told me about this "wet blending", I was intrigued. She said she blends all of her vegetables this way and it's amazing. You just coarsely chop up whatever veggie you're using and fill the blender with water. Pulse the blender a few times and then strain it and you have perfectly minced veggies. I tried it with cauliflower since I love cauliflower rice, but rarely feel like going through the effort with my food processor. It literally took seconds! I was amazed. And it turned out fabulous!!
We've all talked about sharing recipes. Someone at the gym even has a recipe for the tortilla soup! I can't wait to get my hands on that one. What's your favorite way to use your Vitamix? I'd love to try some new things with mine.

Showing posts with label Recipes. Show all posts
Showing posts with label Recipes. Show all posts
Saturday, December 14, 2013


Monday, April 18, 2011
Fish tacos
Had a yummy dinner tonight. Pioneer woman posted earlier today about wanting guacamole and it sparked my desire. I made some salsa, guac and then jumped into the fish tacos. They were perfect! I didn't find any mexican crema so I added cabbage and a tropical salsa. I don't think dinner could've been any better.
Fish Tacos
1/2 red onion, thinly sliced
About 1 1/2 cups red wine vinegar
1/4 cup olive oil
1 1/2 teaspoons ancho chile powder
1 1/2 teaspoons dried oregano
1/2 teaspoon ground cumin
1/4 cup lightly packed fresh cilantro leaves, chopped, plus more for garnish
1 jalapeño, stemmed and chopped
1 pound flaky white fish (such as mahi mahi or cod), cut into 4 pieces
Salt
8 fresh corn tortillas
Mexican crema, homemade or store-bought
Fresh Tomato Salsa
2 limes, cut into quarters
Marinate the Onion Put the onion in a small bowl and pour in enough red wine vinegar to cover well. Set aside for at least 30 minutes or up to several weeks.
Marinate the Fish Pour the olive oil into a small bowl and add the ancho chile powder, oregano, cumin, chopped cilantro, and jalapeño. Mix well. Place the fish on a dish and pour the marinade over it, making sure to coat the fish well on both sides. Allow to marinate for 20 minutes.
Cook the Fish Heat a nonstick sauté pan over medium-high heat. Remove the fish from the marinade and place in the hot pan (there is no need to add more oil). Season the fish with salt. Cook the fish for 4 minutes undisturbed, then turn over, and cook for another 2 minutes. Remove the pan from the heat and flake the fish into the pan with a fork, making sure to mix in all the marinade that has stuck to the bottom of the pan. Check for seasoning and add more salt if necessary. Set aside.
Heat the Tortillas Place four of the tortillas on a plate and sandwich them between two slightly dampened sheets of paper towel. Microwave on high for 45 seconds. Place the warm tortillas in a towel-lined basket or plate and cover. Repeat with the remaining tortillas.
Assemble and Serve To assemble the tacos, place a heaping spoonful of the marinated flaked fish onto the center of a tortilla. Top with the marinated onions. Serve accompanied by Mexican crema and salsa.
Garnish with lime wedges and cilantro sprigs.
COOKING NOTES
Simply Mexican
May 2009
by Lourdes Castro
You can view the complete recipe online at: http://www.epicurious.com/recipes/food/views/Fish-Tacos-352976?mbid=ipapp
Fish Tacos
1/2 red onion, thinly sliced
About 1 1/2 cups red wine vinegar
1/4 cup olive oil
1 1/2 teaspoons ancho chile powder
1 1/2 teaspoons dried oregano
1/2 teaspoon ground cumin
1/4 cup lightly packed fresh cilantro leaves, chopped, plus more for garnish
1 jalapeño, stemmed and chopped
1 pound flaky white fish (such as mahi mahi or cod), cut into 4 pieces
Salt
8 fresh corn tortillas
Mexican crema, homemade or store-bought
Fresh Tomato Salsa
2 limes, cut into quarters
Marinate the Onion Put the onion in a small bowl and pour in enough red wine vinegar to cover well. Set aside for at least 30 minutes or up to several weeks.
Marinate the Fish Pour the olive oil into a small bowl and add the ancho chile powder, oregano, cumin, chopped cilantro, and jalapeño. Mix well. Place the fish on a dish and pour the marinade over it, making sure to coat the fish well on both sides. Allow to marinate for 20 minutes.
Cook the Fish Heat a nonstick sauté pan over medium-high heat. Remove the fish from the marinade and place in the hot pan (there is no need to add more oil). Season the fish with salt. Cook the fish for 4 minutes undisturbed, then turn over, and cook for another 2 minutes. Remove the pan from the heat and flake the fish into the pan with a fork, making sure to mix in all the marinade that has stuck to the bottom of the pan. Check for seasoning and add more salt if necessary. Set aside.
Heat the Tortillas Place four of the tortillas on a plate and sandwich them between two slightly dampened sheets of paper towel. Microwave on high for 45 seconds. Place the warm tortillas in a towel-lined basket or plate and cover. Repeat with the remaining tortillas.
Assemble and Serve To assemble the tacos, place a heaping spoonful of the marinated flaked fish onto the center of a tortilla. Top with the marinated onions. Serve accompanied by Mexican crema and salsa.
Garnish with lime wedges and cilantro sprigs.
COOKING NOTES
INGREDIENTS
Fish
You can use any fish you like so long as you can flake the flesh when it is cooked. Most white fish fall under this category.
Fish
You can use any fish you like so long as you can flake the flesh when it is cooked. Most white fish fall under this category.
TECHNIQUES
Marinated Onions
Once you make this very simple condiment, you will find yourself keeping a container of these onions in your refrigerator to add to all of your dishes.
Don't be alarmed by the amount of vinegar needed to cover the onions completely. Since you will most likely have onions leftover, keep them submerged in the vinegar in a refrigerated airtight container. You can then use the vinegar for your other cooking needs. The onions will keep for several weeks.
Marinated Onions
Once you make this very simple condiment, you will find yourself keeping a container of these onions in your refrigerator to add to all of your dishes.
Don't be alarmed by the amount of vinegar needed to cover the onions completely. Since you will most likely have onions leftover, keep them submerged in the vinegar in a refrigerated airtight container. You can then use the vinegar for your other cooking needs. The onions will keep for several weeks.
ADVANCE PREPARATION
The onions and fish can be made up to a day in advance. When reheating the fish, you may want to add about 1 tablespoon of water to make sure the fish does not dry out.
The onions and fish can be made up to a day in advance. When reheating the fish, you may want to add about 1 tablespoon of water to make sure the fish does not dry out.
Simply Mexican
May 2009
by Lourdes Castro
Tuesday, April 5, 2011
Another great chicken recipe
Tried a new recipe for chicken thighs tonight. It was awesome! I pulled the skin off of mine and the kids. Hubby ate everyone else's skins! Nice to have a new healthy chicken recipe to add to the rotation. Check it out:
http://farmgirlgourmet.blogspot.com/2011/03/honey-glazed-spicy-chicken-thighs.html
http://farmgirlgourmet.blogspot.com/2011/03/honey-glazed-spicy-chicken-thighs.html
Thursday, March 24, 2011
Blueberry Muffins
I've been having such a tough time getting Stephen to eat any breakfast. Last year, as a Freshman he fought me but ate. This year he has dug in his heels and refused to eat in the mornings. I've tried explaining to him the myriad of reasons that he should eat something. I'd baked these blueberry muffins knowing that he likes them but he never even tasted them. I'd put half in the freezer fearing they wouldn't all get eaten. Then as a way to get rid of some of them, I took them as a snack for the boys I was transporting to a swim meet. Of course none of the boys wanted one! I felt like a drug pusher telling them, "Come on they're great and I made them!" Finally one brave boy said he'd eat one and then of course said, "Wow these are really good, can I have another?" That was all it took, the remaining 3 were eaten, one by my son! After that, he's grabbed one every day on the way out the door. Yes!! Success!! It's not the big, balanced breakfast I think he needs but it's a start. I'm guessing he'll get sick of them soon, but hopefully then he'll be willing to try something else. Give them a try, they're great!

http://www.heatherchristo.com/cooks/2011/03/12/buttermilk-blueberry-muffins

http://www.heatherchristo.com/cooks/2011/03/12/buttermilk-blueberry-muffins
Wednesday, March 9, 2011
Salmon Recipe
Here's a recipe that I'm going to try one of these Friday's during Lent. I'll let you know how it is!
http://thepioneerwoman.com/tasty-kitchen/recipes/main-courses/rosemary-and-garlic-roasted-salmon/
If you try it first, let me know how it is!
Okay I finally got to make this recipe. It was pretty good, but I think I like a little "more". I like salmon with mustard or maple syrup or both :) This was good with some sliced avocado on top. I took a picture with my phone, but didn't have a card for my good camera. Anyway, here's a snapshot:

http://thepioneerwoman.com/tasty-kitchen/recipes/main-courses/rosemary-and-garlic-roasted-salmon/
If you try it first, let me know how it is!
Okay I finally got to make this recipe. It was pretty good, but I think I like a little "more". I like salmon with mustard or maple syrup or both :) This was good with some sliced avocado on top. I took a picture with my phone, but didn't have a card for my good camera. Anyway, here's a snapshot:
And yes I used a paper plate, and yes those green beans look a bit brown in this photo. But really the dinner was very good!
Tuesday, March 8, 2011
Carrot Orzo
I was looking for something new for a side dish. Last night I'd made my "fried chicken" recipe and wanted something different to serve with it. I found this recipe in Southern Living Best of 2010.
Carrot Orzo
8 oz carrots, peeled and cut into 1" pieces (about 2 c.)
2 1/2 c. chicken broth
3 T butter
1 medium onion
2 c. uncooked orzo pasta
2 cloves garlic, minced
1 t salt
1/2 t pepper
1 c freshly grated parmesan cheese
3 T chopped fresh chives
1 t chopped fresh thyme
1. Process carrots in a food processor 15 seconds or until finely chopped.
2. Combine 2 1/2 c. water and broth, heat until just before boiling.
3. Meanwhile melt butter in a large saucepan over medium heat. Add carrots and chopped onion, cook stirring occasionally, 5 minutes or until tender. Add orzo and garlic, and cook 1 minute.
4. Slowly stir hot broth mixture, salt and pepper into orzo mixture. Cook stirring often, 15-18 minutes or until liquid is absorbed.
 At this point, I was a little scared because it was so watery. But I kept at it...
5. Stir in Parmesan cheese, chives and thyme until blended. Serve orzo immediately. Garnish with carrot curls.
Here's my final result. And I have a confession...rather than chop the onion, I put it in the food processor after the carrot. I'd recommend just chopping it because I think the processor made it too runny.

Carrot Orzo
8 oz carrots, peeled and cut into 1" pieces (about 2 c.)
2 1/2 c. chicken broth
3 T butter
1 medium onion
2 c. uncooked orzo pasta
2 cloves garlic, minced
1 t salt
1/2 t pepper
1 c freshly grated parmesan cheese
3 T chopped fresh chives
1 t chopped fresh thyme
1. Process carrots in a food processor 15 seconds or until finely chopped.
2. Combine 2 1/2 c. water and broth, heat until just before boiling.
3. Meanwhile melt butter in a large saucepan over medium heat. Add carrots and chopped onion, cook stirring occasionally, 5 minutes or until tender. Add orzo and garlic, and cook 1 minute.
4. Slowly stir hot broth mixture, salt and pepper into orzo mixture. Cook stirring often, 15-18 minutes or until liquid is absorbed.

5. Stir in Parmesan cheese, chives and thyme until blended. Serve orzo immediately. Garnish with carrot curls.
Here's my final result. And I have a confession...rather than chop the onion, I put it in the food processor after the carrot. I'd recommend just chopping it because I think the processor made it too runny.

Monday, February 28, 2011
Country Bread
Ok this is a recipe from Southern Living-Best Recipes 2010. And let me say, it made awesome bread!
2 envelopes yeast
2 c. warm water
1/2 c. sugar
2 large eggs
1/4 c. vegetable oil
1 T. salt
1 T. lemon juice
6 to 6 1/2 c. bread flour
1 T. vegetable oil
1 1/2 T. butter, melted
Combine yeast, warm water and 2 t. sugar in bowl of heavy duty mixer. Let stand 5 minutes. Stir in eggs, next 3 ingredients, 3 c. flour and remaining sugar. Beat dough at medium speed using paddle attachment, until smooth. Gradually add remaining 3 to 3 1/2 c. flour until a soft dough forms.
Turn dough onto a well floured surface and knead until smooth and elastic (about 8-10 minutes), sprinkling with flour as needed. Place dough in a lightly greased bowl, turning to grease top of bread. Cover and let rise about an hour, until doubled in size.
Punch dough down, turn onto a lightly floured surface. Divide dough in half.
Roll each half into an 18X9 rectangle. Starting at the short end, roll the dough pressing the edges to seal. Tuck ends under dough and place seam side down in a lightly greased loaf pan. Brush tops with oil. Cover and let rise another hour or until doubled in size.
Preheat oven 375 degrees. Bake 25-30 minutes until golden brown and sound hollow when tapped. Remove from pans to wire rack and brush with melted butter. Let cool completely, about an hour.

I would've had both loaves in the photo, but the girls and I have already polished off the first loaf!
2 envelopes yeast
2 c. warm water
1/2 c. sugar
2 large eggs
1/4 c. vegetable oil
1 T. salt
1 T. lemon juice
6 to 6 1/2 c. bread flour
1 T. vegetable oil
1 1/2 T. butter, melted
Combine yeast, warm water and 2 t. sugar in bowl of heavy duty mixer. Let stand 5 minutes. Stir in eggs, next 3 ingredients, 3 c. flour and remaining sugar. Beat dough at medium speed using paddle attachment, until smooth. Gradually add remaining 3 to 3 1/2 c. flour until a soft dough forms.
Turn dough onto a well floured surface and knead until smooth and elastic (about 8-10 minutes), sprinkling with flour as needed. Place dough in a lightly greased bowl, turning to grease top of bread. Cover and let rise about an hour, until doubled in size.
Punch dough down, turn onto a lightly floured surface. Divide dough in half.
Roll each half into an 18X9 rectangle. Starting at the short end, roll the dough pressing the edges to seal. Tuck ends under dough and place seam side down in a lightly greased loaf pan. Brush tops with oil. Cover and let rise another hour or until doubled in size.
Preheat oven 375 degrees. Bake 25-30 minutes until golden brown and sound hollow when tapped. Remove from pans to wire rack and brush with melted butter. Let cool completely, about an hour.

I would've had both loaves in the photo, but the girls and I have already polished off the first loaf!
Friday, February 4, 2011
"Fried" Chicken
This recipe was passed along to me by my dear friend Lisa. My family loved it, and it's really tough to please everyone in this clan.


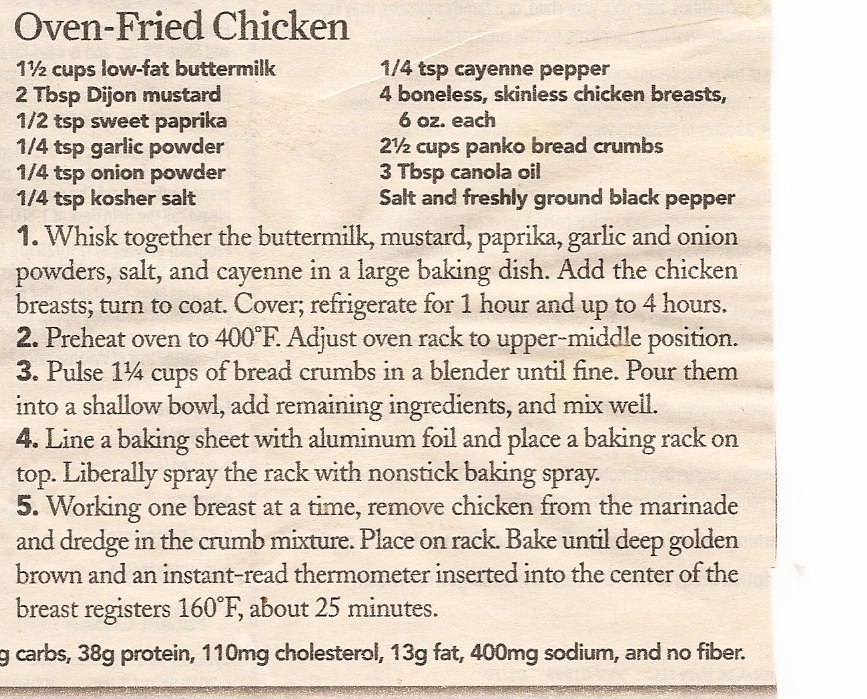
Next time I make it, I'll take a photo of the finished product to add :)
Okay made it again tonight with a side of carrot orzo (I'll post that recipe too). Here are tonight's photos of the chicken.


Subscribe to:
Posts (Atom)